
Oracle XE In Docker On Windows: An Ultimate Guide
Learn how to set up Oracle XE on Windows using Docker. Follow this step-by-step guide to create a local database environment and streamline development.
Setting up Oracle XE in your local development environment can significantly speed up application development by giving you a powerful relational database to work with. This guide provides a straightforward approach to setting up Oracle XE using Docker on a Windows system, followed by creating a schema to start your development journey.
Why Use Oracle XE with Docker for Local Development?#
Oracle XE is a lightweight, free version of Oracle Database that caters to the needs of developers and small-scale applications. Running it in Docker adds the benefit of containerization, allowing:
- Easy setup and cleanup.
- Isolation from your host environment.
- Seamless portability across systems.
Prerequisites#
Before we dive into the setup, ensure you have the following installed on your Windows machine:
- Docker Desktop: Download and install Docker. ↗
- Windows Subsystem for Linux (WSL): Enable WSL if not already configured.
Containerize An Oracle Database#
Step 1: Pull the Oracle XE Docker Image#
The first step is to pull the Oracle XE Docker image from Oracle’s repository or Docker Hub. Open a terminal and run:
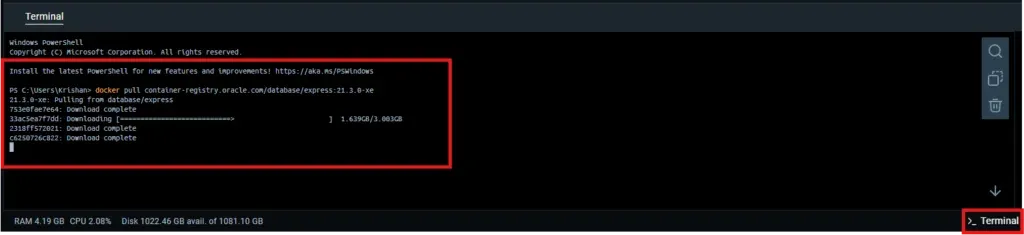
docker pull container-registry.oracle.com/database/express:21.3.0-xeThis command downloads the Oracle XE 21c image to your local system.
Step 2: Run the Oracle XE Container#
Create and run a Docker container using the image you just pulled. Execute the following command:
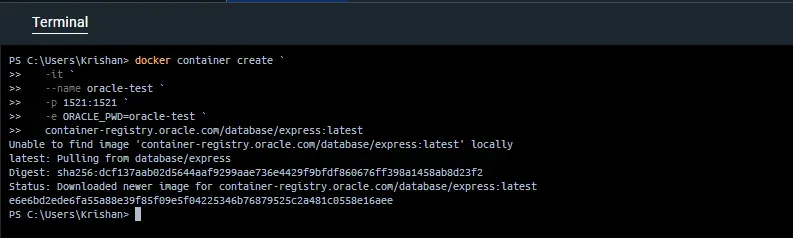
docker container create `
   -it ` # Run the container in interactive mode
   --name [container-name] `  # Name of the container
   -p [host-port]:1521 `  # Map the port from host to container for DB
   -e ORACLE_PWD=[custom-pass] `  # Password for default user
container-registry.oracle.com/database/express:[version] # ImageExplanation:
- —name oracle-xe-container: Names your container for easier reference.
- -p 1521:1521: Maps the database’s port to your local machine.
- -e ORACLE_PWD=your_password_here: Sets the password for the default SYS and SYSTEM users.
After running the command, Oracle XE will initialize inside the container. It may take a few minutes to start up.
Step 3: Verify the Container is Running#

To ensure the Oracle XE container is up and running, execute:
docker psLook for a container named oracle-xe-container in the list. If it’s not running, check the logs for any issues:
docker logs oracle-xe-containerStep 4: Connect to the Oracle XE Database#
You can connect to Oracle XE using any database client, such as SQL*Plus or Oracle SQL Developer. Use the following connection details:
- Host: localhost
- Port: 1521
- Service Name: XEPDB1
- Username: SYS
- Password: The password you set with ORACLE_PWD
- Role: SYSDBA
Oracle XE database container should be up and running now. Once the database is accessible, we need to create schema.
Create an Oracle XE Schema#
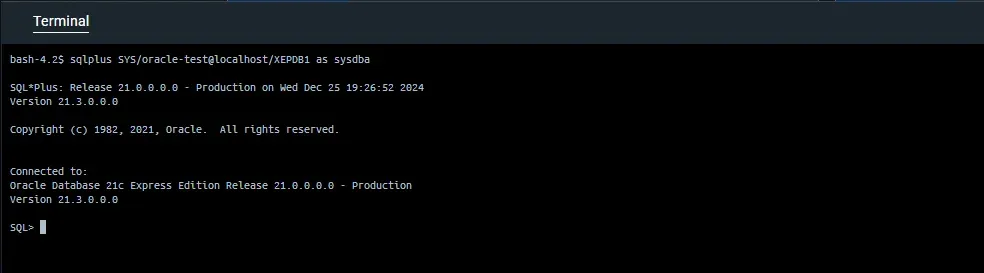
Step 1: Access the Oracle Database Container#
First, connect to the running container:
docker exec -it <container_name_or_id> bash 
Step 2: Log in to SQL*Plus#
Inside the container, use the sqlplus utility to log in as the default database user (e.g., SYS or SYSTEM):
sqlplus SYS/<password>@localhost/XEPDB1 as sysdbaReplace <password> with the SYS password you provided when running the container. XEPDB1 is the default pluggable database name for Oracle XE.
Step 3: Create a New User (Schema)#
A schema in Oracle is effectively a user. To create one:
CREATE USER your_schema_name IDENTIFIED BY your_password;Step 4: Grant Privileges to the User#
To allow the user to connect to the database and create objects:
GRANT CONNECT, RESOURCE TO your_schema_name;Optionally, you can grant additional privileges as needed, such as:
GRANT DBA TO your_schema_name;Step 5: Connect to the New Schema#
Exit SQL*Plus by typing exit, and log back in as the new user:
sqlplus your_schema_name/your_password@localhost/XEPDB1Step 6: Test the Schema#
You can now create tables and other objects in the new schema:
CREATE TABLE Test (
    id NUMBER PRIMARY KEY,
    name VARCHAR2(100)
);